Show the UIMenuController and Display Custom Edit Menus for UIViewController, UITableViewController, and UICollectionView on iOS 7

Menu Popup for Copy and Paste using UIMenuController

The UIMenuController is an easy way to give the user copy/paste menu features in an app. You can also use it to expose custom features like saving, viewing, or deleting content. It can be a little tricky to setup and show the menu, so I'll show you how to get started.

We'll need to implement some methods from the UIResponder class in order to enable the popup UIMenuController to appear. Missing any of the lines of code below means that you won't see anything.

UIResponder Class Methods

Managing the Responder Chain

Validating Commands

UIMenuController Video Tutorial

UIMenuController Code Tutorial

I like to use tap gestures because they're quick to setup and are fun to use in iPhone apps. All we need to do is add a gesture for the view and then we can display a menu for the current UIViewController. Add the UITapGestureRecognizer in your viewDidLoad method and then we'll implement all the UIResponder methods and our custom action methods.

- (void)viewDidLoad
{
    [super viewDidLoad];

    UITapGestureRecognizer *tapGesture =
      [[UITapGestureRecognizer alloc] initWithTarget:self
                                              action:@selector(handleTapGesture:)];
    [self.view addGestureRecognizer:tapGesture];
}


- (void)handleTapGesture:(UITapGestureRecognizer *)tapGesture {
    NSLog(@"tapGesture:");
//    CGRect targetRectangle = self.tapView.frame;
    CGRect targetRectangle = CGRectMake(100, 100, 100, 100);
    [[UIMenuController sharedMenuController] setTargetRect:targetRectangle
                                                    inView:self.view];

    UIMenuItem *menuItem = [[UIMenuItem alloc] initWithTitle:@"Custom Action"
                                                  action:@selector(customAction:)];

    [[UIMenuController sharedMenuController]
     setMenuItems:@[menuItem]];
    [[UIMenuController sharedMenuController]
     setMenuVisible:YES animated:YES];
    
}

- (BOOL)canBecomeFirstResponder {
    return YES;
}

- (BOOL)canPerformAction:(SEL)action
              withSender:(id)sender
{
    BOOL result = NO;
    if(@selector(copy:) == action ||
       @selector(customAction:) == action) {
        result = YES;
    }
    return result;
}

// UIMenuController Methods

// Default copy method
- (void)copy:(id)sender {
    NSLog(@"Copy");
}

// Our custom method
- (void)customAction:(id)sender {
    NSLog(@"Custom Action");
}

UITableView and UICollectionView Require More Code

It's important to understand that if you're doing this on a custom UIView or for your UIViewController subclass that it'll behave differently from a UITableView or UICollectionView.  To work with the UITableView or UICollectionView you'll need to use a few extra methods or nothing will show on screen. These methods give you fine grain control on showing context specific menus based on what content is being displayed in the UITableView or UICollectionView.

UITableViewDelegate Methods

Copying and Pasting Row Content

UICollectionViewDelegate Methods

Managing Actions for Cells

UIWindow and the keyWindow

The UIMenuController can only be displayed on the key window. There are times where you might use someone else's library or framework to display a full-screen advertisement or maybe a mobile printing solution like Sincerely Ship. In these cases I have run into issues where the third-party code has changed key windows, by adding their own UIWindow and didn't reset the key window. This will result in UIMenuController not working, so you can fix it by using this line of code when your viewDidAppear: is called.

[self.view.window makeKeyWindow];

Resources

Let me know if this post was helpful. I spent a lot of time trying to research it and figure out solutions to some of the common problems. You can take a look at the resources that I found helpful.

Connect

  1. Join my iPhone mailing list to keep learning about making iPhone apps.
  2. For more structured learning, signup for my online iPhone app course.

Objective-C Syntax Highlighting with Squarespace 6 using SyntaxHighlighter without Developer Mode

Syntax Highlight for Objective-C on Squarespace 6

Update 6/19/14: This method works for Safari, but it keeps failing in Chrome. I've disabled it for now until I can investigate a better option. The code and method should still work, but the comparisons won't look different below.

I write a lot of code samples and I was using SyntaxHighlighter on my wordpress blog, but since I started using Squarespace I didn't have an easy solution to get it working. I spent the day digging around the internet and found some guides on how to get it to work without the Developer Mode on Squarespace. 

Syntax highlighting is useful because it makes it easier to digest what the different parts of a blog post are. You can easily separate the content from the code because of the coloring. I'll show a comparison with pros/cons and then you can jump to the guide to setup your Squarespace blog.

Code Sample Comparison for Squarespace Blogs

Code Paragraph Style

Here is a code sample without syntax highlighting using the "Code" paragraph style for the monospace font. It's rather buggy to get right in Squarespace 6. You copy paste into Squarespace and the formatting will be off (I have to delete every other newline (return)). Then I have to apply the "Code" tag and reformat again. It's super picky and if you modify the text too much you may have to reformat it.

Pros:

  1. Works out of the box
  2. Don't need to escape "<" characters with &lt;

Cons

  1. Spacing is buggy
  2. Lots of text formatting
  3. Deleting text lines near, in, or around the Code paragraph style can alter the formatting


#import "ViewController.h"
@interface ViewController () <UIGestureRecognizerDelegate> {
CGFloat _centerX;
}
@end

@implementation ViewController
- (void)viewDidLoad {
[super viewDidLoad];

UIScreenEdgePanGestureRecognizer *leftEdgeGesture = [[UIScreenEdgePanGestureRecognizer alloc] initWithTarget:self action:@selector(handleLeftEdgeGesture:)];
leftEdgeGesture.edges = UIRectEdgeLeft;
leftEdgeGesture.delegate = self;
[self.view addGestureRecognizer:leftEdgeGesture];

// Store the center, so we can animate back to it after a slide
_centerX = self.view.bounds.size.width / 2;
}
@end

As you can see it becomes hard to read and really see the code. There is no syntax highlighting and controlling the spacing is manual. I'd have to manually fix each line to get it to indent properly, instead of defaulting to my copy/paste from my code editor.

SyntaxHighlighter Code Highlighting

Here is the same code sample with SyntaxHighlighter. Instead of doing a Text block, I use a Code block with HTML. To learn how to set it up, keep on reading below.

I'll use the <pre></pre> installation method so that the code is inline with the blog, as opposed to the script method. The script method doesn't work well with RSS readers. Note: If you want your code indexed by Google, you'll want to use <pre></pre> to rank higher in search for the code.

Pros

  1. Multiple programming languages supported via brushes.
  2. Respects code formatting/spacing

Cons

  1. Need to escape the < "less-than" characters as &lt; (Find and replace all in the code block)
#import "ViewController.h"

@interface ViewController () <UIGestureRecognizerDelegate> {
    CGFloat _centerX;
}
@end
@implementation ViewController
- (void)viewDidLoad {
    [super viewDidLoad];
    
    UIScreenEdgePanGestureRecognizer *leftEdgeGesture = [[UIScreenEdgePanGestureRecognizer alloc] initWithTarget:self action:@selector(handleLeftEdgeGesture:)];
    leftEdgeGesture.edges = UIRectEdgeLeft;
    leftEdgeGesture.delegate = self;
    [self.view addGestureRecognizer:leftEdgeGesture];
    
    // Store the center, so we can animate back to it after a slide
    _centerX = self.view.bounds.size.width / 2;
}
@end

SyntaxHighlighter Makes Code Readable on your Blog

Now that you've seen the comparison, let's jump right in and set you up with SyntaxHighlighter on Squarespace 6. You don't need to upload files or enable developer mode to make it work. Instead we can link to already public javascript and css files.

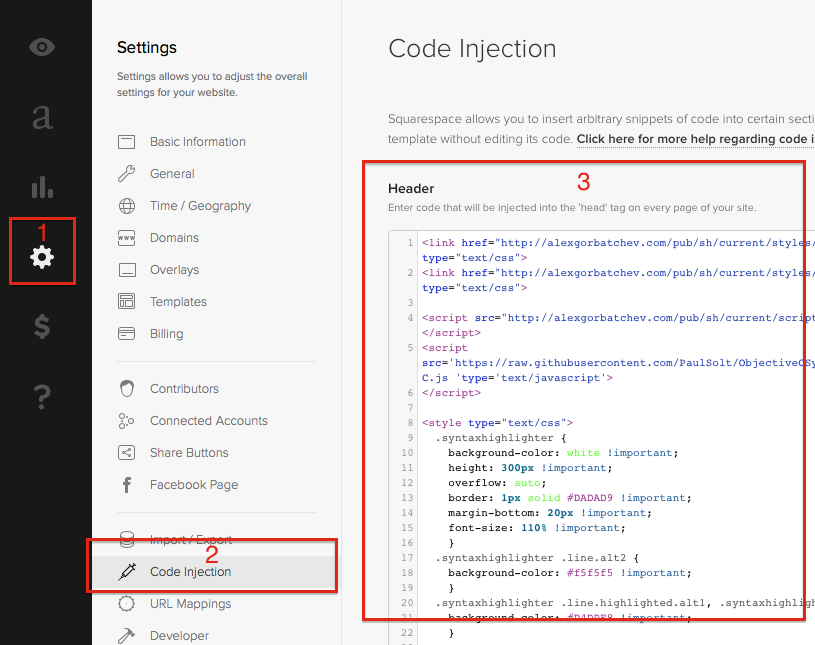
1. Go to your Squarespace Settings Tab > Code Injection > Header

Settings &gt; Code Injection &gt; Header to add custom code to all pages hosted on &nbsp;your Squarespace domain.

Settings > Code Injection > Header to add custom code to all pages hosted on  your Squarespace domain.

2. Add the following code to get syntax highlighting working for Objective-C, CSS, and javascript. I code in Objective-C, but I needed Javascript and CSS to show the code for this post.

<link href="http://alexgorbatchev.com/pub/sh/current/styles/shCore.css" rel="stylesheet" type="text/css"> 
<link href="http://alexgorbatchev.com/pub/sh/current/styles/shThemeDefault.css" rel="stylesheet" type="text/css"> 
 
<script src="http://alexgorbatchev.com/pub/sh/current/scripts/shCore.js" type="text/javascript"></script> 
 
<script src='https://raw.githubusercontent.com/PaulSolt/ObjectiveCSyntaxHighlighter/master/scripts/shBrushObjC.js 'type='text/javascript'>
</script>

<script src="http://alexgorbatchev.com/pub/sh/current/scripts/shBrushJScript.js" type="text/javascript"></script>
<script src="http://alexgorbatchev.com/pub/sh/current/scripts/shBrushCss.js" type="text/javascript"></script>

<style type="text/css">
  .syntaxhighlighter {
    background-color: white !important;
    height: 300px !important;
    overflow: auto;
    border: 1px solid #DADAD9 !important;
    margin-bottom: 20px !important;
    font-size: 110% !important;
    }
  .syntaxhighlighter .line.alt2 {
    background-color: #f5f5f5 !important;
    }
  .syntaxhighlighter .line.highlighted.alt1, .syntaxhighlighter .line.highlighted.alt2 {
    background-color: #D4DDF8 !important;
    }
 
 
</style>
  
<script language="javascript"> 
  SyntaxHighlighter.config.bloggerMode = true;
  SyntaxHighlighter.config.space=' ';
  SyntaxHighlighter.all();
</script>
 
 
<!--  Uncomment a brush for your programming language syntax highlighting

<script src='http://alexgorbatchev.com/pub/sh/current/scripts/shBrushCpp.js' type='text/javascript'></script>
<script src='http://alexgorbatchev.com/pub/sh/current/scripts/shBrushCSharp.js' type='text/javascript'></script>
<script src='http://alexgorbatchev.com/pub/sh/current/scripts/shBrushJava.js' type='text/javascript'></script>
<script src='http://alexgorbatchev.com/pub/sh/current/scripts/shBrushPhp.js' type='text/javascript'></script>
<script src='http://alexgorbatchev.com/pub/sh/current/scripts/shBrushPython.js' type='text/javascript'></script>
<script src='http://alexgorbatchev.com/pub/sh/current/scripts/shBrushRuby.js' type='text/javascript'></script>
<script src='http://alexgorbatchev.com/pub/sh/current/scripts/shBrushSql.js' type='text/javascript'></script>
<script src='http://alexgorbatchev.com/pub/sh/current/scripts/shBrushVb.js' type='text/javascript'></script>
<script src='http://alexgorbatchev.com/pub/sh/current/scripts/shBrushXml.js' type='text/javascript'></script>
<script src='http://alexgorbatchev.com/pub/sh/current/scripts/shBrushPerl.js' type='text/javascript'></script> 
-->

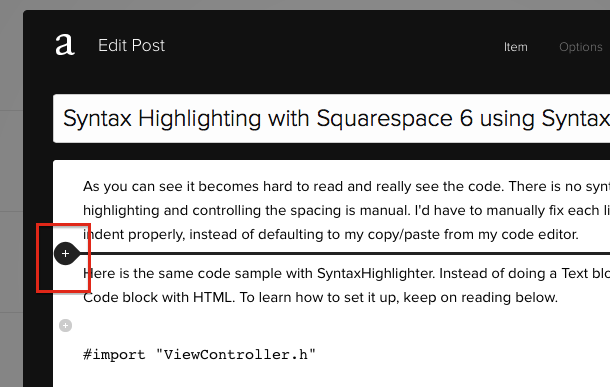
3. Add a Code block for HTML code, and disable "Display Source". You'll have to hover the mouse on the left side of your "Edit Post" popup window with Squarespace 6. You'll see a "+" to add a new block.

Add a new block by hovering your mouse on the left side of Squarespace

Add a new block by hovering your mouse on the left side of Squarespace

4.  Scroll down in the popup until you find "Code" under the "More" section. Click it to add it. Or you can drag it to a specific position in the layout of your blog post on Squarespace 6.

Scroll down and look for the Code block under the More category.

Scroll down and look for the Code block under the More category.

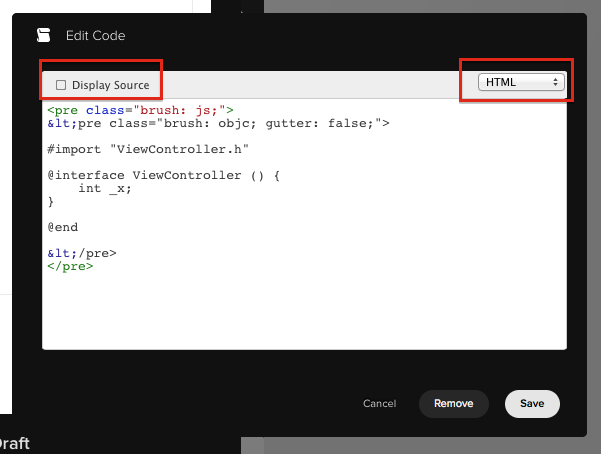
5. Turn off the "Display Source" option and use the HTML code to have the code work properly.

Add your source code and make sure to replace any "<" characters with the &lt; escape code for proper HTML formatting. If you don't, your source code won't render correctly and you'll see strange things on your blog page.

Disable the "Display Source" and make sure you are on HTML code. All &lt; characters should be replaced with &amp;lt;

Disable the "Display Source" and make sure you are on HTML code. All < characters should be replaced with &lt;

6. Add some sample code to display with syntax highlighting.

Sample code (Copy/Paste to your code block)

<pre class="brush: objc">
#import "ViewController.h"

@interface ViewController () {
    int _x;
}

@end
</pre>

Output of Sample Code

#import "ViewController.h"

@interface ViewController () {
    int _x;
}

@end

Gotchas:

Code is Editable on Double-Click

The code uses a property to make it easy to copy/paste the full code block. If you want to disable this behavior you can add the code to disable quick-code. If you click off of the text area, it'll jump back to the code. It's a little annoying, but it can make it easier for your readers to copy/paste code from your website to their IDE.

<pre class="brush: objc; quick-code: false;">
#import "ViewController.h"

@interface ViewController () {
    int _x;
}

@end
</pre>


How do I Remove Line Numbers?

Set the gutter to false after you set the brush. Include a ; (semicolon) to separate multiple arguments.

Source

<pre class="brush: objc; gutter: false;">
#import "ViewController.h"

@interface ViewController () {
    int _x;
}

@end
</pre>

Output

#import "ViewController.h"

@interface ViewController () {
    int _x;
}

@end

Xcode Copy and Paste Issue with Non-breaking Space Characters - &nbsp;

Using the default script that I have linked has a bug where when you double click and copy, the code inserts non-breaking space character codes. &nbsp; or &#160;

To fix this, make sure in the code you placed under Code Injection in Squarespace's settings that you include an explicit white space character for your spaces. You can set this to any character you'd like. Normal spaces will fix the copy/paste issues.

<script language="javascript">
  SyntaxHighlighter.config.bloggerMode = true;
  SyntaxHighlighter.config.space=' ';
  SyntaxHighlighter.all();
</script>

SyntaxHighlighter Can't find brush for: js (etc)

Can't find brush for: js - We didn't uncomment or add the correct language brush for SyntaxHighlighter

Can't find brush for: js - We didn't uncomment or add the correct language brush for SyntaxHighlighter

You'll need to include a new script for each language that you want to support code formatting. I would only include the ones that you need.

You'll get this error dialog when a user loads the page and the brush type isn't supported. (Or if the source file original links you've used no longer exist)

Resources

Let me know if this post was helpful. I spent a lot of time trying to research it and figure out solutions to some of the common problems. You can take a look at the resources that I found helpful.

Connect

  1. Join my iPhone mailing list to keep learning about making iPhone apps.
  2. For more structured learning, signup for my online iPhone app course.

Screen Edge Swipe Gesture on iPhone using the UIScreenEdgePanGestureRecognizer Tutorial

 
UIScreenEdge Gesture Recognizer for iPhone Side Swipe Detection

UIScreenEdge Gesture Recognizer for iPhone Side Swipe Detection


I was working on updating my Mat Border Calculator app, and I ran into a bug with the new UIScreenEdgePanGestureRecognizer. It doesn't really have much documentation, and didn't behave as I expected.

It's only property is a edges attribute, but when I set the property to a set of edges (left and right) nothing happened. I thought there were issues with the view hierarchy in my app, so I created this test project. Because it wasn't intuitive and because I didn't see any working code I've posted the project on github so that you can learn how to use it to.

Edge Swipe Demo Video

In my sample view you can see how I can use the x-coordinate to move the entire ViewController's view (iPhone screen) to the left and to the right! It's pretty crazy, check it out here: 

Edge Swipe Gesture Code

1. Declare an ivar at the top of your ViewController.m file in the top as part of the Class Extension

#import "ViewController.h"

@interface ViewController () <UIGestureRecognizerDelegate> {
    CGFloat _centerX;
}
@end

2. Create a UIScreenEdgePanGestureRecognizer in your -viewDidLoad method. Add it to your self.view, so that it will work across the entire iPhone screen.

- (void)viewDidLoad {
    [super viewDidLoad];
    
    UIScreenEdgePanGestureRecognizer *leftEdgeGesture = [[UIScreenEdgePanGestureRecognizer alloc] initWithTarget:self action:@selector(handleLeftEdgeGesture:)];
    leftEdgeGesture.edges = UIRectEdgeLeft;
    leftEdgeGesture.delegate = self;
    [self.view addGestureRecognizer:leftEdgeGesture];

    // Store the center, so we can animate back to it after a slide
    _centerX = self.view.bounds.size.width / 2; 
}

3. Add a new method to handle the gesture and do whatever you want with the translation variable. I only care about the x coordinate, so that's what I'm using in this demo.

- (void)handleLeftEdgeGesture:(UIScreenEdgePanGestureRecognizer *)gesture {
    // Get the current view we are touching
    UIView *view = [self.view hitTest:[gesture locationInView:gesture.view] withEvent:nil];
    
    if(UIGestureRecognizerStateBegan == gesture.state ||
       UIGestureRecognizerStateChanged == gesture.state) {
        CGPoint translation = [gesture translationInView:gesture.view];
        // Move the view's center using the gesture
        view.center = CGPointMake(_centerX + translation.x, view.center.y);
    } else {// cancel, fail, or ended
        // Animate back to center x
        [UIView animateWithDuration:.3 animations:^{
            
            view.center = CGPointMake(_centerX, view.center.y);
        }];
    }
}

4. Conform to the UIGestureRecognizerDelegate delegate protocol (optional). See #1 above on how to conform to the delegate in the .m file using the Class Extension syntax.

- (BOOL)gestureRecognizer:(UIGestureRecognizer *)gestureRecognizer shouldRecognizeSimultaneouslyWithGestureRecognizer:(UIGestureRecognizer *)otherGestureRecognizer {
    // You can customize the way in which gestures can work
    // Enabling multiple gestures will allow all of them to work together, otherwise only the topmost view's gestures will work (i.e. PanGesture view on bottom)
    return YES;
}

Sample Code on GitHub

Download the sample code and see how quick an easy it is to use it in your iPhone apps.

https://github.com/PaulSolt/UIScreenEdgePanGestureDemo