How to remove an array of objects from a Swift 2 Array - removeObjectsInArray

removeObjectsInArray Swift Protocol Extension.png

I was working on a game project in Swift and I wanted to remove objects from an Array, only to discover that my goto method from Objective-C’s NSMutableArray (removeObjectsInArray:) didn’t exist.

Removing multiple objects from an Array takes multiple steps – when you iterate over an Array you cannot remove objects. It’s a two step process, you need to discover which objects need to be removed and then you need to iterate through that list and remove each one, one at a time.

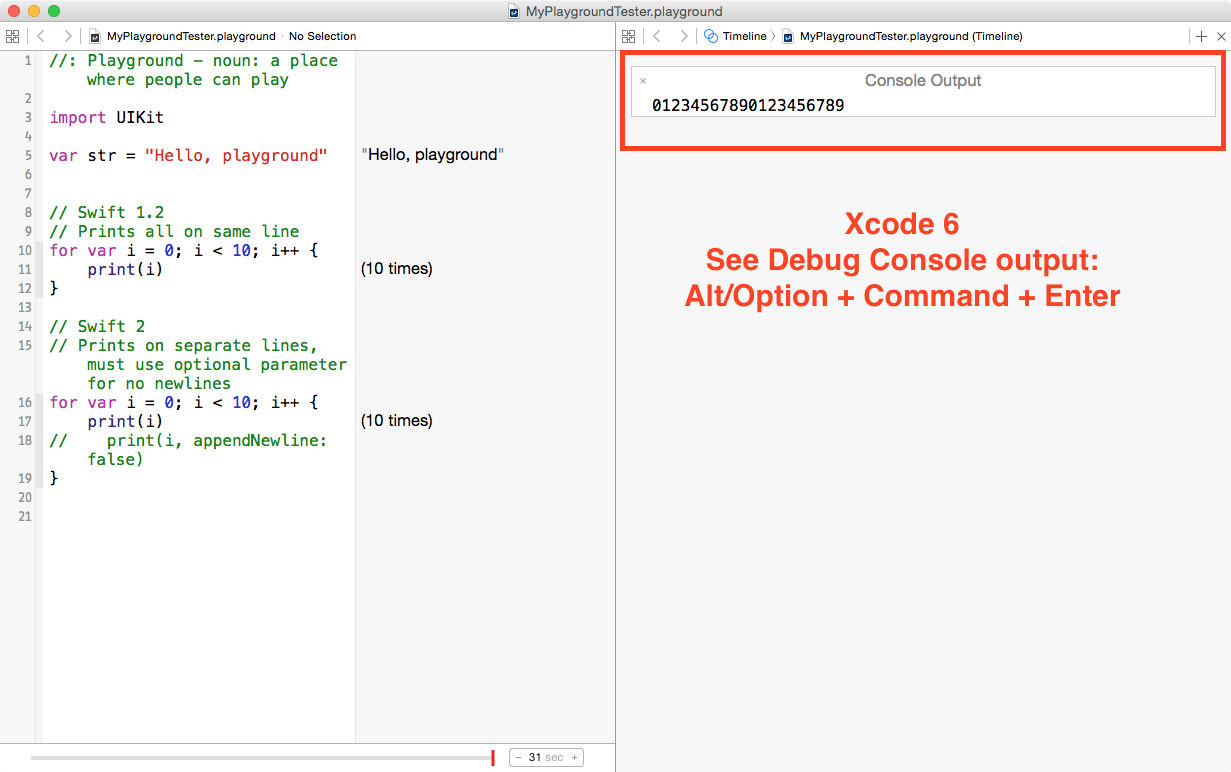
The code has changed between Swift 1.2 and Swift 2 – I’ll include both to show the differences.

Swift 1.2 Remove Multiple Objects from an Array

You can start by creating an array of objects – add to the end with append() or insert() at a specific index.

Next you will need to search for something in your Swift Array – for this example you’ll look for words with a specific letter. 

Lastly you’ll need to remove each word that contains the letter one at a time, outside of your first loop.

// Swift 1.2
var wordArray = ["Apple", "Carrot", "Peanut Butter"]
wordArray.append("Hummus")
wordArray.insert("Greek Salad", atIndex: 0)

// Find the objects to remove
var wordsToDelete: [String] = [String]()
for word in wordArray {
    if contains(word.lowercaseString, "p") {
        wordsToDelete.append(word)
    }
}

// Find the index and remove each object
for word in wordsToDelete {
    if let index = find(wordArray, word) {
        wordArray.removeAtIndex(index)
    }
} 

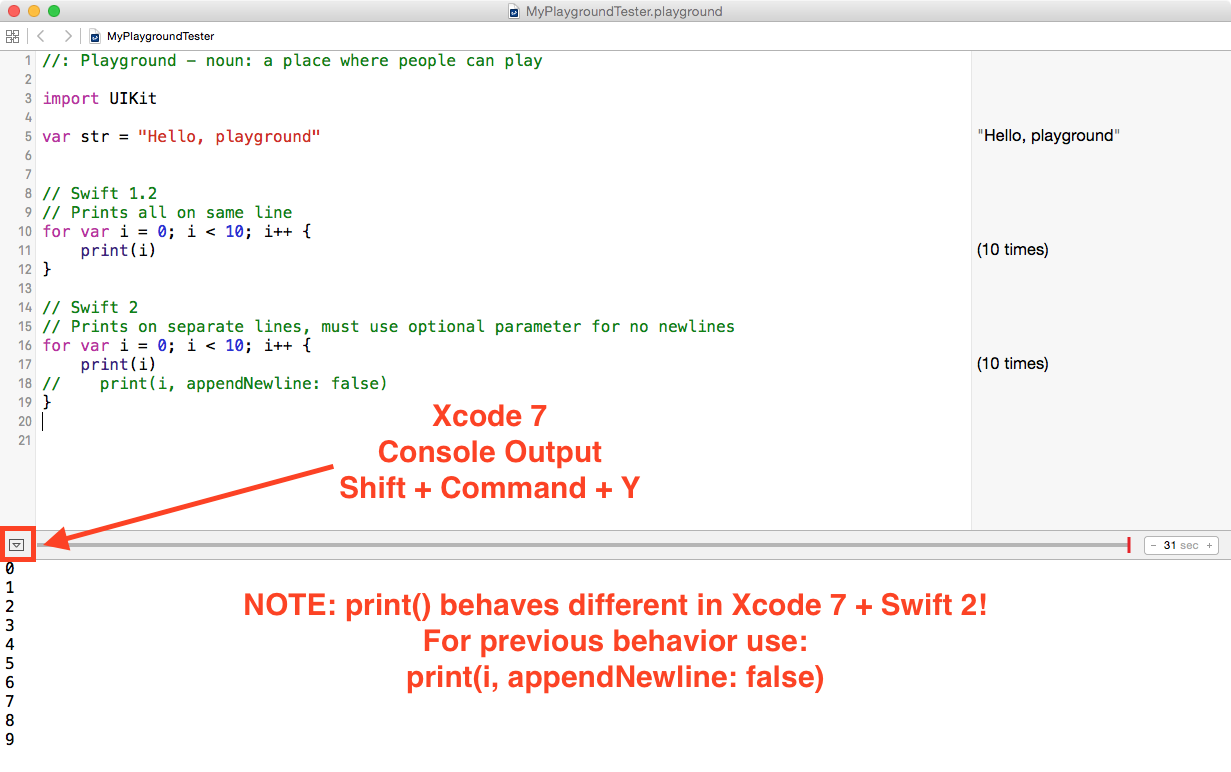
Swift 2 Remove Multiple Objects from an Array

Swift 2 changes the contains() function to a contains() method using Protocol Extensions and since we’re working with Swift 2 Strings – the character property needs to be used.

The global find() function is now replaced by the new indexOf() method on Array (technically CollectionType).

// Swift 2
var wordArray = ["Apple", "Carrot", "Peanut Butter"]
wordArray.append("Hummus")
wordArray.insert("Greek Salad", atIndex: 0)

// Find the objects to remove
var wordsToDelete: [String] = [String]()
for word in wordArray {
    if word.lowercaseString.characters.contains("p") {
        wordsToDelete.append(word)
    }
}

// Find the index and remove each object
for word in wordsToDelete {
    if let index = wordArray.indexOf(word) {
        wordArray.removeAtIndex(index)
    }
} 


Swift 2 Array Protocol Extension removeObjectsInArray

With the basics of removing objects from an Array you can take it a step further to get back to a single line of code to remove objects.

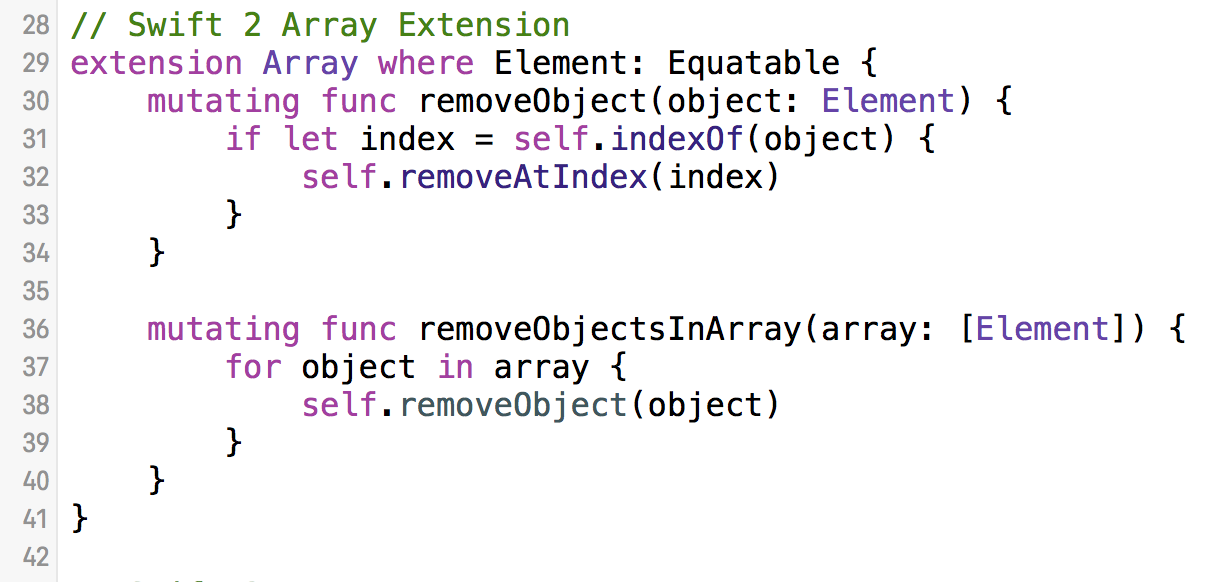
Using an extension in Swift 2 allows you to add functionality that’s missing from the Array type. An Array is a structure, so you’ll have to use the mutating keyword and the Element is the type of object that is in the Array (generics).

Equatable means that the type must support the == (equal to) method, which is required to find an object. String objects are already equatable, so you don't need to do any extra work. If you are storing a custom object you will need to implement your own isEqual method.

// Swift 2 Array Extension
extension Array where Element: Equatable {
    mutating func removeObject(object: Element) {
        if let index = self.indexOf(object) {
            self.removeAtIndex(index)
        }
    }
    
    mutating func removeObjectsInArray(array: [Element]) {
        for object in array {
            self.removeObject(object)
        }
    }
}

With the Array Extension you can simplify your last 4 lines of code into a single line of code to remove an array of objects.

// Swift 2
var wordArray = ["Apple", "Carrot", "Peanut Butter"]
wordArray.append("Hummus")
wordArray.insert("Greek Salad", atIndex: 0)

// Find the objects to remove
var wordsToDelete: [String] = [String]()
for word in wordArray {
    if word.lowercaseString.characters.contains("p") {
        wordsToDelete.append(word)
    }
}

// Remove an array of objects
wordArray.removeObjectsInArray(wordsToDelete)

Free Online Swift App Course

Subscribe and get access to the Free iPhone App Course – you can make your first iPhone app using Swift.

Xcode 7 moves Playgrounds Console Output and breaks print() and println()

Xcode 7 Playgrounds behave differently than Xcode 6 Playgrounds – the user interface has changed, the Console Output has moved, and print() is different.

Playgrounds have the ability to show in-line code output, but don't be confused as it's not formatted the same way for println() and print() statements. Playgrounds "Quick Looks" provide a formatted view of your data, but if you want to see what it looks like, you need the Console Output. This moved back down to the Debug Area in Xcode 7 (from the Assistant Editor in Xcode 6).

Breaking println() and print behavior in Swift 2

Xcode 7 makes breaking changes to the behavior of the println() and print() methods. In Swift 2 you will be using print() to display text into the Console (Debug Area).

print() will append a newline to your text, which breaks the previous behavior where it didn't append newlines. If you want to prevent newlines you need to use the new optional parameter and pass in false.

// Swift 1.2
// Prints all on same line
for var i = 0; i < 10; i++ {
    print(i) // no newlines
//    println(i) // appends newline
}

// Swift 2
// Prints on separate lines, must use optional parameter for no newlines
for var i = 0; i < 10; i++ {
    print(i)  // appends newline
//    print(i, appendNewline: false)
}

Xcode 6 Playground Console Output

In order to see your Console Output from a print() statement in Xcode 6 you had to open the Assistant Editor (Venn Diagram icon) with the keyboard shortcut "Alt/Option + Command + Enter"

If you were lucky you would see output (assuming no code errors) and then if you accidentally closed the Console Output you would have to type something in the editor for the Playground and press Enter to get it to recompile and redisplay the Console Output.

Xcode 6 Playgrounds:&nbsp;Press Alt/Option + Command + Enter to see the Console Output

Xcode 6 Playgrounds: Press Alt/Option + Command + Enter to see the Console Output

Xcode 7 Playground Console Output

Xcode 7 changes how the Console Output works and makes this process less error prone and more streamlined. The Console Output is no longer displayed on the Assistant Editor, instead its below the standard editor in the normal Debug Area.

Press "Shift + Command + Y" to hide/show the Debug Area with the new Console Output, or you can press the tiny arrow button in the bottom left corner of your Playground in Xcode 7.

Xcode 7 Playgrounds: press Shift + Command + Y to see Console Output

Xcode 7 Playgrounds: press Shift + Command + Y to see Console Output

The good news is that the changes to Xcode 7 make the Playgrounds a more friendly code environment. It's easier to get to the Console Output without the clunky behavior of the Assistant Editor, which makes Playgrounds feel more like first class citizens.

Free Online Swift App Course

Subscribe to the iPhone Newsletter and learn how to make your first iPhone app in Swift with my free online iPhone app course.

OptionSetType Swift 2 Error: Nil is not compatible with expected argument

If you've been using Swift 1.2 or earlier, or you're an experienced Objective-C developer you'll discover using some APIs is different. 

Apple has been revamping all the APIs in Swift + Objective-C to support the latest Swift 2 language.

Apple has added Generics, Error Handling, and the OptionSetType which will change a large portion of the APIs – especially anything that takes option/setting flags.

Code Massaging

Moving forward you're going to have to massage your existing code, or your old programming habits to work with the new APIs.

I highly recommend opening a Documentation window (Shift + Command + 0) with Swift, since the Quick Help fails to work when you have a syntax error – something that didn't happened in Objective-C.

OptionSetType

The animatWithDuration: API that works with the spring physics has changed it's options: parameter to the new OptionSetType.

var myFirstLabel: UILabel!

func tapped(gesture: UITapGestureRecognizer) {
    UIView.animateWithDuration(0.5, delay: 0.0, usingSpringWithDamping: 0.9, initialSpringVelocity: 0.0, options: nil, animations: {
        
        self.myFirstLabel.center = CGPoint(x: 100, y:40 + 200)
        
        }, completion: nil)
}

In Xcode 6 this code works with Swift 1.2 or lower, however if you run it in Xcode 7 + Swift 2 you'll get the following Error.

Swift 2 Errors

You might see either of these errors, depending on the version of Xcode. Error messages are continuing to evolve, some are even more helpful in diagnosing the problem.

ViewController.swift Nil is not compatible with expected argument type 'UIViewAnimationOptions'

ViewController.swift Cannot invoke 'animateWithDuration' with an argument list of type '(Double, delay: Double, usingSpringWithDamping: Double, initialSpringVelocity: Double, options: nil, animations: () -> _, completion: nil)'

Solution

The error is because the type for the options: parameter is wrong – you'll have to pass in an empty OptionSetType in order to compile.

nil should be replaced with []

Apple has changed options for many existing APIs, instead of being a NS_OPTIONS bitmask, in Swift 2.1+ they are treated as a Set in syntax and behavior. To pass no options (i.e. nil) you pass the empty set: [ ]

UIView.animateWithDuration(0.5, delay: 0.0, usingSpringWithDamping: 0.9, initialSpringVelocity: 0.0, options: [], animations: {
    
    self.myFirstLabel.center = CGPoint(x: 100, y:40 + 200)
    
    }, completion: nil)

Follow me

Have you seen any strange error messages?

Send a Tweet to @PaulSolt