

Create an IBDesignable UIView subclass with code from an XIB file in Xcode 6
/
You can create a custom UIView subclass and load the interface from an XIB file. In Xcode 6, you can also go a step further and provide design time visualization and customization in Xcode’s Attributes Inspector.
This is a big deal if you’ve ever loaded an XIB file from code and attached it to a user interface. In the past, you could block out the colors of the UI, but you could never see the composition. You also couldn’t change any of the parameters at design time within your main Storyboard or XIB file.
Custom UIView Subclass (e.g.: CustomView)
These are the steps to making a custom UIView that is designable within Xcode:
Create a View .xib file (e.g.: CustomView.xib)
Design the user interface in Xcode
Set up Auto Layout constraints
Create a Swift code file (CustomView.swift)
Set .xib file’s “File’s Owner” custom class to CustomView (it must match the class name)
Implement both CustomView initializers: init(coder:) and init(frame:)
Load the UIView from the .xib file using the NSBundle and UINib classes
Add the view as a subview and property for the class (future modifications)
Add autoresizing masks for the view to match the size of the CustomView itself
Make the view’s frame leverage the design time size of the embedded CustomView’s bounds
Note
If you leverage any image assets, you’ll want to make sure they are in the same bundle as the custom view. This is especially important when trying to leverage extensions or static libraries.
Visual Guide for a custom UIView from an XIB file
In the following steps I will visually show and explain what you'll need to do to create an IBDesignable and IBInspectable UIView that you can reuse in your iPhone apps. You will be able to leverage the power of design time editing in Xcode along with a better visualization of what your app will look like.
1. Create a View XIB file (e.g.: CustomView.xib)
The first thing you'll need is a new user interface file called an XIB or .xib or nib file. This is like a storyboard file, but it only holds a single UIView object.
Create a new file from the Menu bar using File > New > File or the keyboard shortcut Command + N:
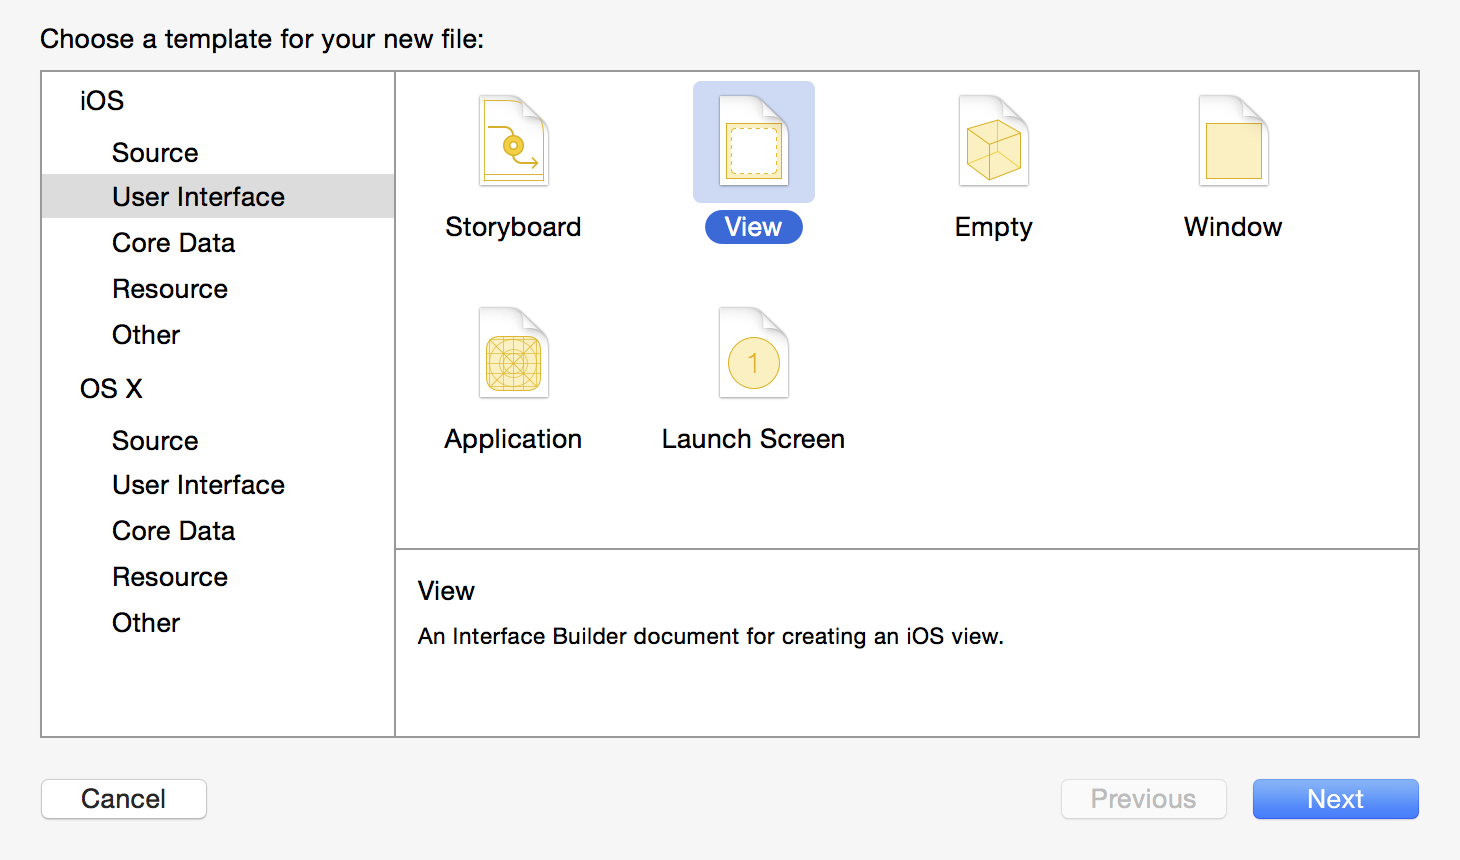
Select iOS > User Interface > View; name it “CustomView” and add it to your target:

2. Setup the UIView for a custom size and disable the status bar.
The UIView will initially be setup for a full-screen iPhone view with a standard size and a status bar. You'll need to make some adjustments to use a smaller size.
Set the Size to “Freeform” and the Status Bar to “None:”

3. Design the UI for your custom control or widget
Leverage the power of Xcode to drag and drop the UI elements for your custom widget. Drag out buttons, labels, image views, and anything else that you want to display in the custom view.

4. Connect Auto Layout constraints to control layout
Depending on how your control is going to be used, you will want to setup constraints that either keeps the size fixed or make the control adaptive to larger interfaces.
You can select all of the UI elements to see if the connections are good. Blue = good, orange = missing constraints, and red = conflicts. Using constraints you need to establish the rules to set the width, height, and position of every UI element.
Auto Layout enables the relative layout of visual elements in your iOS app:

5. Create a Swift code file to drive the custom UIView or UIControl
You need to connect the XIB file to a Swift code file in order to provide the brains or logic to power the UI element. You'll be creating actions and outlets that will be used to change the visuals or respond to input.
Create a new code file using File > New > File > iOS > Source > Cocoa Touch Class:

On the next screen, subclass the UIView class and choose Swift:

6. Connect the XIB file and the Swift code file together using the “File’s Owner” attribute
The XIB user interface file will be loaded when the view is ready to display on your iPhone. In order for it to work with your code file, you'll need to make it aware of what Swift file is going to preform all the logic.
On the right panel, set the Custom Class name to the same name as your Swift code and XIB file:

7. Add code to load from a .xib file using the NSBundle and UINib classes
I wish the tutorial could end here. Unfortunately, Apple doesn't provide an easy way to connect the UI you designed to your UIView subclass. To connect the two, you are going to write some code that will load the user interface and place it inside the edges of the view in code.
Create two methods to load the .xib file from the bundle in which it’s located:
    // Our custom view from the XIB file
    var view: UIView!

    func xibSetup() {
        view = loadViewFromNib()

        // use bounds not frame or it'll be offset
        view.frame = bounds

        // Make the view stretch with containing view
        view.autoresizingMask = [UIViewAutoresizing.FlexibleWidth, UIViewAutoresizing.FlexibleHeight]
        // Adding custom subview on top of our view (over any custom drawing > see note below)
        addSubview(view)
    }

    func loadViewFromNib() -> UIView {

        let bundle = NSBundle(forClass: self.dynamicType)
        let nib = UINib(nibName: nibName, bundle: bundle)
        let view = nib.instantiateWithOwner(self, options: nil)[0] as! UIView

        return view
    }
You need to add a property to store the view that will be loaded from the XIB file. It might seem a little odd to store a view as a property within a UIView object. A custom UIView is just a composition or hierarchy of UIView objects that use position, size, color, and images to create the final look.
You'll also add two methods that will assist with the following step.
The first method, xibSetup() will be called from the initializers in the next step, when the UI is loaded. The loadViewFromNib() method will do the complex loading work from the file system.
8. Implement the initializers and leverage the code to load from an .xib file
Leverage the common code in both initializers used in UIView creation using your xibSetup() method.
You must make sure to call the super methods so that the correct UIView initialization occurs. The init(coder:) is called when creating your view within another interface file. The init(frame:) is called when creating your view programmatically (see below).
    override init(frame: CGRect) {
        // 1. setup any properties here

        // 2. call super.init(frame:)
        super.init(frame: frame)

        // 3. Setup view from .xib file
        xibSetup()
    }

    required init?(coder aDecoder: NSCoder) {
        // 1. setup any properties here

        // 2. call super.init(coder:)
        super.init(coder: aDecoder)

        // 3. Setup view from .xib file
        xibSetup()
    }
9. Add a new UIView object to your Storyboard file and set the Custom Class name
Drag a UIView object onto the Storyboard canvas for your current View Controller. Resize the UIView element to fit a smaller portion of the app screen. Note: If it’s the first object you add, it’ll be huge.
Temporarily, change the UIView color to non-white, so you can see it:

To get the Storyboard to load the correct UI element, you'll need to set this "blank" UIView to act as the placeholder for your custom class. Doing so will trigger the init(coder:) method to create your custom UIView at run-time. You can learn more about this process by reading the top description from Apple's UIView Reference or the UIViewController Reference (click "more..." to read the hidden description).
You will need to change the class name to “CustomView” in the Identity Inspector:

10. Make the CustomView.swift file IBDesignable
At the top of your Swift code file, you need to add @IBDesignable in Swift. Xcode will now compile (takes a few seconds) and embed your custom UIView inside a Storyboard file.
    import UIKit

    @IBDesignable class CustomView: UIView {

    }
11. Click on/off Main.storyboard to get Xcode to refresh your custom UIView
You should be able to make changes to your CustomView and see the changes in the Storyboard. Sometimes this can be buggy, especially if there is an issue. To force an update you can click on/off the Storyboard file, or you can use the new menu bar option described below.

An easier option is to select the Storyboard file and click on a custom view that's breaking. In the menu bar, do the following:
Editor > Debug Selected Views
OR
Editor > Refresh All Views
Tip: Watch a video on how this works in Xcode 6.1.1
12. Add IBOutlets and IBActions to connect code and UI together
To work with any of the UI in code you must make connections with Outlets and Actions.
Open the Assistant Editor and then you can right-click and drag from the user interface into the associated code file. Create outlets for any UITextField, UIButton, or UILabel if you need to change the text. If you have a button, you'll need to setup an action to invoke a method using the style buttonNamePressed(sender:).

You should have a set of outlets and actions like the following:
    @IBOutlet weak var label: UILabel!
    @IBOutlet weak var imageView: UIImageView!
    @IBOutlet weak var button: UIButton!
    @IBAction func buttonPressed(sender: AnyObject) {
        // do something
    }
Note: If you display an image, the UIImageView will need clipToBounds set to true to prevent artifacts and overdrawing.
13. Make an IBInspectable attribute to change the image at design time
The IBInspectable property allows you to expose functionality in code that can alter the appearance of the custom UIView. You can expose properties that are either computed, which gives you a hook to update the appearance.
Add code to alter the image using a computed property around the imageView outlet:
    @IBInspectable var image: UIImage? {
        get {
            return imageView.image
        }
        set(image) {
            imageView.image = image
        }
    }
14. Change the image at design time using the Attribute Inspector property
You can alter the appearance or settings for your custom UIView by changing parameters in the Attribute Inspector. Any property that you tag with @IBInspectable will be visible at the very top of the list of settings.
Change the text or even a corner radius using a computed property and the view.layer.cornerRadius value.

Resources
- Custom UIView with IBDesignable Elements - Apple’s Objective-C Code Sample
- Building Custom UI Elements With IBDesignable and IBInspectable - Think and Build
- How to Build a Custom (and “designable”) Control in Swift - Think and Build
- Debugging Xcode Live Rendering - Morten Bogh
- Nib Designable - Xcode Live Rendering With Nibs Made Easy - Morten Bogh
Summary
You can use this technique to create your own UIControl subclasses, just like UIButton or UILabel. UIControl provides the Target/Action model of interaction that allows you to create buttons, sliders, and more.
Using @IBInspectable you can also provide computed properties that can be changed using the Attributes Inspector at design time (convenient for non-programmers).

Connect
Share this post on Twitter
Let me know how you use it at @PaulSolt
Checkout my Swift iPhone app courses
Download the source code on github